Hello everyone,
I hope you are all doing well. I am sorry if I have not been around the past 2 weeks. Jo and I had vacation time and we booked a last minute trip. We just got back from a wonderful cruise to Bermuda. We had amazing weather and very smooth waters...thank goodness.
I loved the trip but was excited to come home because the day we left I finally finished the kitchen renovation.
Here are some picture of the original kitchen.
My main complaint was that there was not enough cooking surfaces for a house the size of the manor. When you think of the family of 6, the banquet hall for 20 and the number of staff to cook for, I don't care how great a cook was in the kitchen it just would not work. I tried adding wall ovens on the back wall....
...but the Bodo Henning range, while beautiful, was just too small. Also, some of the built-ins I made were a bit chunky...things like shelves being too thick...it bothered me. So without further ado, I present to you...
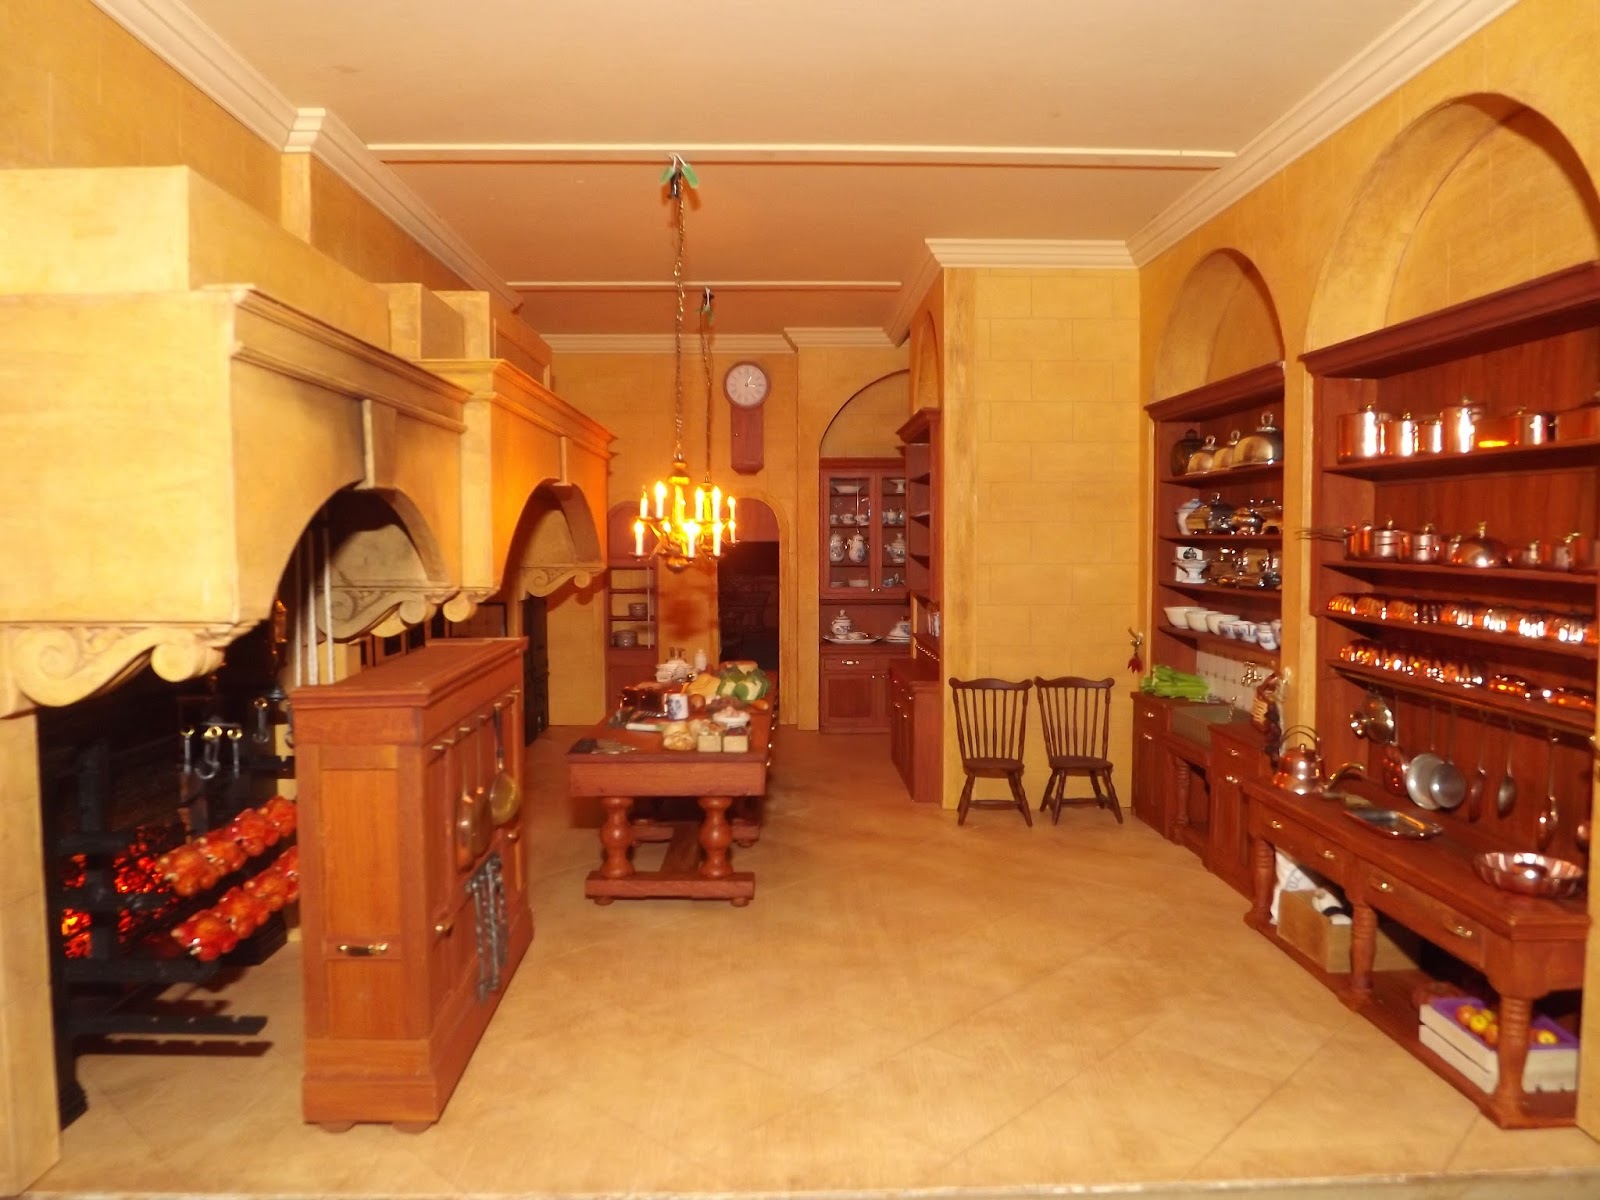
The Kitchen
The new kitchen design was inspired by the old kitchen at Chatsworth house.
Today it is used as a wood working shop (that sound is my heart breaking). I especially loved the chimneys and based my design around them. A long while back I posted some dry run pictures of the kitchen...
...I played around with the foamcore chimneys and after several floorplans I decided I would rather have all the cooking ranges on one side. The rest of the kitchen just fell into place.
The Chimney wall
The east wall of the kitchen consists of 3 stone chimneys.
The one on the left is the roasting range for spit cooking meat. The middle one houses a 13 inch cooking range which has 2 fire boxes, and the right chimney is for 2 large wall ovens. The chimneys are made with double ply illustration board and leftover lumber for support and solidity. The brackets are from
Sue Cook.
The cooking range and roasting range chimneys arches were made by slowly bending a strip of 2 ply illustration board with wood blocks to hold the strip in place at the right angle. The picture above is the 13 inch one.
I added a back to the arch structure and then angle pieces so it would look more realistic when seen from underneath. The oven chimney had a smaller arch which did not protrude as much into the room, so I made it by gluing together 3 layers of the illustration board. that made is very solid and not too thick.
When the chimneys were built, I added basewood strips and molding to dress up the front.
Finally, I covered the entire structure with 3 coats of gesso.
I made the faux stone finish with Americana and Delta Ceramcoat paints. I sponged on a coat of light buttermilk, then a coat of sand paint. I then dipped my brush in antique gold paint, dipped it in water, then went over the entire surface...kind of a really intense yellow wash. I wiped it off with paper towels and let it dry overnight. I then went over it with a wash of 90% water and 10% dark brown paint. When that was dry I took a stylus and a metal ruler, and made the 2 x 1 inch stones. You will see it better in pictures to come. Next step, the cooking.
Roasting range, cooking range and wall ovens
The wall ovens are very simple.
I took double illustration board and cut out the oven section and added some clock hands I purchased at Micheals and some knobs and molding. I glued everything on with The Ultimate glue then painted over it with Rust-Oleum spray paint which is used for patio furniture.
The cooking range, as well as the ovens, were inspired by the kitchen at Audley End house. Again I started with illustration board, molding and clock hands...
... and then I made the fire boxes to hold the coal .
I really am not sure exactly how everything worked. I just copied what I see and this was the result.
At this point the fireboxes and range were painted with the spray paint separately. I only assembled them after the coal was glued in place. I also built the back wall of the range using 1/16 x 1/16 molding and laminated wall tiles. I spray painted the "Iron" part before installing the tile inserts. In the next picture you also see the doors to the flues which are made of basewood and leftover handles.
When all was dry and the colas inserted, I glued it all into the chimney.
The roasting range was a bit more of a challenge. It is basically a giant grate. I based it on the one at the Royal Pavilion, one of the favorite buildings I've visited. I started by making the arms to hold the spits out of 1/8 x 1/4 inch basewood strips.
I then cut out an illustration board back (2 ply) and glued on some 1 inch lumber to make the sides. Prior to assembly I drilled holes where the barres that hold the coal will go.
I then added molding on the base of the side supports and inserted the brass rods.
Here is the finished piece before painting...
...and after painting. Each range and the ovens took about 6 coats of spray paint to be completely covered, and then 2 coats of varnish to protect the finish.
With the roasting range done I got to work on the spit mechanism, again inspired by the one at the Royal Pavilion. I started by gluing beads and a gear to a brass rod. I made 3 u-shaped brackets out of 1-16 basewood and painted it all black.
I glued it into place and voila!
The rope goes between the beads and are attached to each spit. It does not work, but I tried to make the gears and the mechanism look as real as possible. In real life, the smoke would make a turbine built into the chimney turn and the gears would make the spits turn.
The last step was to dirty the roasting range. I used my utility knife and a stick of charcoal to make powder, then applied it with an old brush.
Earlier on I mentioned the coals I needed to install. This was tricky because I could not find anything that worked with the sizes of my ranges. I saw some bloggers using tic tac containers and cutting them to the right height, but the roasting range was so large that the square box looked horrible and fake. I finally thought ofcutting out the sides of the orange tic-tac box and I held the plastic over a tea candle until it just got soft. I then put it onto a piece of crumpled up aluminum foil to create the texture of coal.
In the picture you can see I used another piece of foil to help push the soft plastic into the aluminum foil to create the texture...do NOT use your fingers...I found out the hard way. Also I recommend doing this outside. The smell of the plastic melting could not have been good for me. When the plastic was cold I used a tip from the great Elizabeth from
studioeminiatures and dabbed the plastic with black glass paint which is used to imitate lead. I glued them into place and light them from behind with grain of wheat bulbs and voila! The chickens are roasting nicely on the spit, and you can see 2 bottle jacks for roasting smaller cuts of meat from
Sussex crafts.
I still might dirty up the other chimneys, but I am happy with the results. I finally have enough cooking surface ;)
Built ins
I created arches from the illustration board the same way I made the chimneys. The floor is just painted single ply illustration board done the same way as the walls, but with a 50/50 dark brown wash and a square pattern.
The built ins were made using the 2 ply illustration board and more leftover lumber. My goal was to use up what I had and not order anymore wood. It involved a lot of thinking, but mission accomplished! I wanted the doors flush with the units, so I took single ply illustration board and cut out the doors and drawers. After painting I glued everything back onto the unit.
In the next picture you can see every piece for the 4 units. I assembled some but kept shelves, drawers and other pieces separate so it would be easier to paint the wood grain.
Of course I had several dry runs to make sure everything works as I had planned.
After the sections were painted, I glued them into the arches. In the past I have used 1/8 inch wide strips and dug grooves into them to hold the shelves. This time around I realised I was out of 1/8 so I used 1/16 instead because I had a lot of it lying around. I cut one piece to the height of the unit, then cut pieces to act as spacers between the shelves. When the units were built I covered the edge with thin molding to cover the construction.
Pot rack
The first arch houses the pot rack. It was important to me that I display my copper pot collection properly. After I decided on the shelves and their measurements, I needed to find a way to hang the pans. I decided, rather then hooks which would be limiting, to drill holes through 2 small pieces of faux finished lumber and attach 2 brass rods.
I then glued it underneath the bottom shelf. I purchase me copper pots and pans from
Jason and Jacqueline Getzan and they always supply hooks with each piece. This way I have 2 rows to accommodate anything that needs hanging.
The bottom part of the pot rack has the only 2 working drawers in the kitchen. The rest are fake as are all the cupboard doors. The base of the unit was made with 3 leftover newel posts.
Sink
The sink was also purchased from
Sussex Crafts as were all the handles for the kitchen. Once again I used leftover newel posts for the sink base and drilled holes for the plumbing. I used the same laminated cardboard tile for the backsplash that I used for the cooking range.
The sink is a gamekeeper's sink. It would be used to wash and rince off some food and fill pots and pans.
I loved the drying rack and the double sinks in the old kitchen, but I decided to have a much larger scullery in the basement of the manor instead of cramming it into the kitchen.
Butler's pantry
I was dissatisfied with the old butlers pantry. The shelves were made with lumber that was much to thick. It completely ruined the illusion for me, not to mention my wood grain was off because I pre assembled the unit before painting it.. This time around all the shelving in the kitchen was made using 1/16 inches. It made all the difference. Unlike the rest of the storage units which were all glued onto a back piece stuck to the wall, the top of the butler's pantry was made by building the front first.
This enabled me to make a removable section so I could install my china outside of the manor then slide it in place. I try to not make opening doors because they always seem to come undone or get pulled out by visitors. The unit was really snug in the arch so I did not have to come up with a system to hold it in place like the last time. I just built a shelf for the unit to sit on.
The last unit for food storage was made the same way. The spice drawer doors are just a 1/16 inch piece of lumber I cut up, painted and glued on. I really wanted to order
StokesayWares Victorian kitchen jars and actually spaced the shelves to accommodate them, but that will have to wait. I worked on plans for the banquet hall on our trip and it will cost me a pretty penny. Maybe one day I'll have my jars, but if not, the kitchen still looks pretty good.
The Ceiling
The top of the room was damaged when I ripped out the old chimney and column of the old kitchen, so I just painted a piece of double thick illustration board with the Light Buttermilk color I used as the first coat of the faux stone finish. I cut a groove into it for the wires to sit in. After it was glued in I installed the crown molding and I took 2 wood strips, painted them to match and drilled a whole for the light fixture. This covered the chanel for the wire.

It adds a bit of architectural interest to the room, but still keeps is simple as most kitchens were.
Dumb Waiter
With the scullery in the basement and the banquet hall on the top floor, I needed a way to get food and things up and down easily. I found a picture of a dumb waiter I liked online and built one of my own. The unit is a box with shelves. I covered the front of it with vertical wood strips to act as spacers. The front of the waiter is 2 layers of illustration board that finish flush with the stone walls, and then I built an arch which matched the doorway to cover the gap.
The spacer permitted me to install the rope which would have been pulled up or down to make the waiter climb or descend. The back of it was painted like stone. I saw a lot of dumb waiters with closed doors, but I thought this one would be perfect for the kitchen.
Clock
I wanted a clock with a large face so the cook could keep an eye on things. This one is a simple box I made, 3/8 inches deep, with a circle I cut for the face. I found the clock face online, printed it, glued it on and varnished it. The handles were in the same pack I used for the hinges on the ranges and ovens. I think the fact that they are not painted or printed on makes a big difference.
I put all these pieces together and the kitchen walls were complete.
The table
One of my biggest challenges has been to find big furniture for the manor. Most miniature furniture is made with small kit rooms in mind. I knew from the start I wanted a large table for several people to work on. I had some turned wood pieced I purchased on a past trip. I decided to use them as feet as they were just the right height. I cut out 4 sets of wood strips and drilled holes to accommodate the wood pieces.
Drilling a large hole in the wood caused it to split. I used painters tape to tightly wrap each piece and that kept it from splitting. I then glued on the turned wood pieces, connected the leg units with lumber strips, and built a box out of wood and illustration board for the drawer section.
The drawers are simply pieces glued on the sides of the table. I used leftover strips as spacer so all the drawers would align properly. The top of the table are 1/8 x 1/2 inch strips I glued on. When I mention wood strips, I always refer to basewood. I added handles to the drawers and my 13 inch by 3 1/2 inch table was done.
Victorians used massive wardrobe like screens in front of the roasting range. The exterior was made of wood that protected the cooks and the interior was lined with tin that reflected the heat onto the meat. It was mounted on wheels and could be moved around the kitchen. My version was inspired by the one an Penrhyn castle. I added on some hooks for pans that were too long to fit in the pot rack, and the fire tool set.
The inside needs to be painted to look like tin, but I figured you have waited long enough for a post. Often time the interiors had shelves to keep plates warm.
And finally the kitchen adventure comes to an end. I still need to make a drip pan for the roasting range, and I want to build a bain marie to fill some of the empty space at the front of the room, but I think I have enough of the kitchen for the moment. Here are a few more pictures for you to enjoy.
I know many of you loved the old kitchen, in fact many family membered voiced their criticism when I ripped out the old one, but I think the new kitchen is far more realistic in terms of function and the stone walls and dark wood are more dramatic and fit in the manner much better. Never let anyone or anything, especially fear, keep you from redoing something until it is just right.
In my last post, I was asked what music I listen to when I work. I usually have dvds about English Country Houses or the last season of Downton Abbey on while I work, but the last few time I had music on is was usually Madonna's last 2 albums or Tchaikovsky's Sleeping Beauty.
Also, I would like to thank Feedspot for selecting my blog as one of the Top 100 Miniature Blogs on the web. It is a great honor and I appreciate it very much.
Next time I will either present the countess' study or the ballroom. I wish you all the best, and as always thank you for following me on this most likely never ending journey.
Big hug to all,
Giac