Dollhouse Blogs

Monday 20 February 2012

Boy's Bedroom and past projects

Hello everyone! I hope you are all doing well and having a great week. This past weekend I finished the Boy's room.
The room measures 17" x 14" and 11 5/8" high. I'm afraid I don't have anything new to say about this room. I've used all the techniques and talked about them before.

The fireplace is an inexpensive resin one I faux painted using a technique by Whitledge-Burgess. I wanted the walls to be panneled, but chose a simpler design then the public rooms of the house. Because I wanted this room to have a masculine feel, I applied 3 coats of shellac to the floors wheras the Girl's Room and Bedroom hall only got 2. The Shellac flakes I use are Garnett Color. Each time you add a coat the floor gets a darker, orange color.
The furniture was purchased years ago and intended to be a master bedroom suite. Of all the bedroom sets I've seen I think this was one of the most masculin. I folded a piece of cotton fabric I had left over on the matress. I love the yellow in this room and would like a red fabric bedcover. Late victorians stopped using heavy drapery on the beds because they worried it wasen't hygienic. However, this is my house, so if I decide to hang drapes, so be it!
And here's a look at the empty room. I always think the empty rooms look smaller then they are

And that was progress for this week. Next, the Master Bedroom. I have a VERY busy couple of weeks coming up, so it might be a little while before my next post.

I have to take a moment and thank you all for your wonderful comments. You flatter me with all your kindess and I think it high praise indeed coming  from such talented artists as yourselves. I say it every week but it's the truth, it meas a lot to me and keeps me going. Several times friends have commented that being afraid of failure keeps them from trying. The only reason I have acheived what I haven is because I never shy away from a challenge. If I mess up, big deal! I swear a little, laugh a lot, and move on.

Since my post was rather short, I figured I'd put up some pictures of the last projects I built before starting on Dewell Manor.  When I think of the Foxhall Manor I built, all I think about are my errors: bad crown molding (attached with nails no less), bad paint, oversized tiles and grout lines, crooked construction, rediculous hinging on cabinet doors, bad brick work in the kitchen...


I was happy witht he popsicle stick flooring on the second floor

I loved my design for the kitchen and was happy to scratch build everything...but boy do I wish I had payed more attention to the small details


I must admit, I was really happy with the appliances I made, however, the hinges on the cabinets ruined the effect

World's  largest grout lines


Do not use high gloss paints on  miniature doors and trim


I made this room for my # 1 aunt Lorraine. I used it to test several Whitledge-Burgess Techniques I read about in a magazine article. I was happy enough with the box to take on Dewell Manor

 I knew my work was good, not great, but I hoped I could do better. I did research on miniatures, Victoriana, full size construction, various art mediums, carpentry...I know there are things that just come naturally to me, but that's no reason not to try and improve what I am strugglign with. NEVER shy away from a challenge!

On that note, I wish you all a wonderful week. I will be commenting on your blogs I promise, work has just been taking A LOT out of me the past few weeks and the computer is the last thing I want to look at when I get home.

I wish you all the best my friends
Huge Giac hugs to all,
No Fear!

Giac

Sunday 12 February 2012

Scullery

Hello everyone,
I hope you all had a good week. Things at work are back to normal for the moment. It was really crazy, but I spent my free time working on he scullery to try and forget about the office.


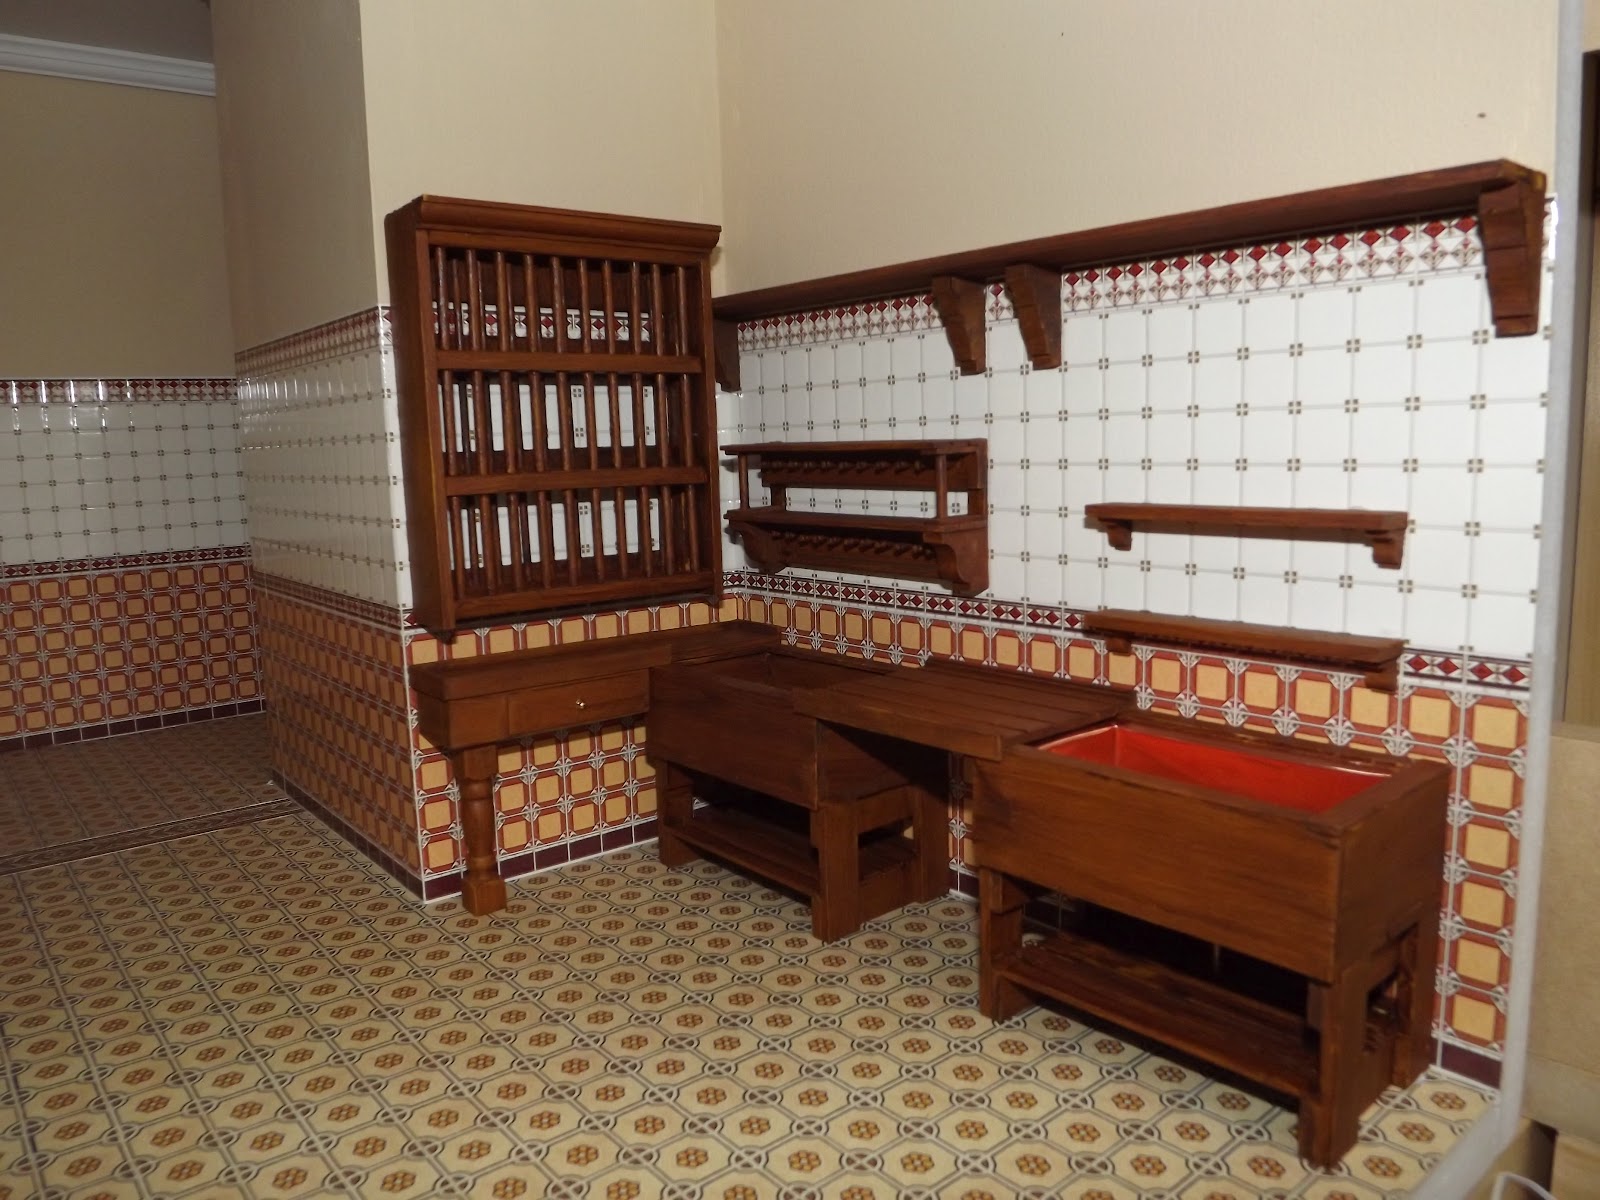
Since Dewell Manor's kitchen is 24 inches by 20 inches,  I decided to take one area and build a proper scullery.

The first Item I put together was the Dish rack.

I started by drilling evenly spaced holes on some leftover pieces of lumber I had lying around. I then cut dowels to the height I wanted the dish rack, in this case enough for 3 levels.
When the dowels were through the supports, I spaced them using a 1 1/4 inch piece of wood and glued them into place

 Next, I put together the top and side of the dish rack box and glued in the dowel pieces when it was dry
I glued on the second side piece. For the back piece, I glued pieces of 1/8 inch x 1/16 inch lumber at the same level as the horizontal supports. Next, I took more dowels and glued them to line  up with the front piece. In the next picture, you see me adding another 1/8 , 1/16 inch piece of lumber to help support the dishes.


While the rack dried, I made the cup rack

This is just another piece of lumber 1/4 wide with holes drilled through. instead of using dowels for the cup pegs, I cut off the tips of cocktail toothpicks that had a nice detail. I made 2 of these, glued them onto 2 supports and added shelves, corbels, and 2 small dowels do look like supports for the top shelf.

Next came the sinks
I have 2 porcelain sinks in the kitchen, so I decided the scullery would have 2 other sinks. The first one is a wood sink victorians used to wash china (porcelain sinks would chip the dishes) and the second is a copper sink used for messy preperation (cleaning fish and washing pots and pans).

Both sinks are simple wood boxes on wood supports.
 I used embossing metal sheets for the copper sink. This is a fairly soft sheet of copper. It is easy enough to cut with a utility knife and very easy to fold. I first made a smaller wood box to fit into the sink. I glued down the bottom piece of metal, and then folded a strip around the sides which went over the top of the smaller box. (see above picture) I cut thin strips of the metal and glued those over the top of the copper sink to cover any wood you could see.
 In the above picture, I dropped the copper sink into the woood piece and covered the gap with 1/4 x1/8 molding strips.
Finaly, I drilled a whole in the bottom of the sink and filled it with a brass grommet (used for dollhouse electrifying) for the drain and I glued a piece of copper dowel underneath. I tried making faucets with , but they looked awful so I'm going to purchase them.

I made a small counter with a drawer that goes under the plate rack. It has a small lip to help guide the water that drips from the dishes into the wood sink. The counter between the 2 sinks is a piece of wainscott sample I had. The grooves are just the right size to send the water back into the sink when pots are drying. I painted everything to look like dark wood.


And once everything was dry, I glued it all into place
I also put together a clothes rack that will hang from the ceiling in front of the kitchen stove

 I'm not going to hang it yet. I want to eventually purchase a wrought iron pot rack and will decide what the best placement for both item is.

If anyone is interested in Victorian kitchens I found a wonderful British series called "Victorian Kitchen":

http://www.youtube.com/watch?v=SoJnEJlwCpU&feature=results_main&playnext=1&list=PL66C52B53F7E34468

It's a 9 episode series in which they repair a real victorian kitchen, hire a cook who started off as a scullery maid in the late 1920s and she prepares food in the same way the victorians did. The first episode has a lot of information about how the kitchen  was set up.

I also reccomend a book called "The Victorian House" by Judith Flanders. It talks about everything in the victorian middle class home. It gives a good idea of the work that servants went through on a daily basis.


Next I will tackle the 3 unfinished rooms of the second floor. I've been putting it off bcause I didn't feel like cutting all the floor planks, but now I have to in order to go forward.

I also want to thank Maria from  http://prettythingsireland.blogspot.com/ for giving me a Blog Fantabuloso award! My first award! Thank you so much Maria, I REALLY appreciate it and it means a lot coming from you.

I hope you all have a wonderful week and I wish you all the best,
Hugs,
Giac

Monday 6 February 2012

Grand Staircase Bay Window, Ladders and scullery

Hello everyone,
I hope you've all been well. I've been putting in way too much overtime at work and not getting enough sleep, but I did manage to get a few small projects done.

Gallery and staircase Bay window
The first project I got done is the staircase window. The window opening is 12 inches high by 6 inches wide. I started by making a simple frame out of basewood. In the next picture, I cut the ends of the angled pieces at 45 degree angles. I glued them with carpenter's glue and gel super glue.

When the angled pieces were set I glued the vertical frame pieces, then the smaller horizontal pieces. In the next picture you see the window structure put together.  

When this was all dry, I glued on 1/4" x 1/8" pieces to create the sashes to hold the window panes. To finish off this window, I cut crown molding into thin strips to create the gothic arches at the top of the window.

I'm going to glue this window in using just a few dots of hot glue. Since this section of the house is 12 inches wide and 34 inches deep, I want the window to be removable in case I need access to the staircase for cleaning or repairs.

The next project I worked on were the ladders for the Library Bookcases.

I simply took 1/8" by 1/4" lumber and drilled holes the same diameter as my dowels 5/8 inches apart.
I glued them together with The Ultimate Glue . I then painted them to match the library wood. I was lucky enought to find necklace clips that were just the right size for the hooks to hold the ladder onto the bar at the top of the bookcases.


I'm currently working on cutting wood strips for flooring, and I'm working on the scullery. Here's a look at the plate rack and the wood sink. The sink looks exactly like the one I saw in old pictures, but it doesn't translate well in miniature...it just looks too bulky so I'm going to start it over.

And that is all I've done. I'm hoping the insanity at work has passed for a while so I can spend a little more time on Dewell Manor. 
I haven't had much free time to comment on your blogs and I apologize, but rest assured I am going through them and as always your work never ceases to amaze me.
I hope you all have a wonderful week, and I will try to have the scullery finished by sunday.
I wish you all the best,
Giac